Introduction to Deep Learning
Recurrent Neural Networks
1. Lecture
The lecture slides are available here.
2. Practical
Context
The goals of this session are to practice with implementing a Recurrent Neural Network, understanding the involved computations, and more generally, to build a full Deep Learning pipeline in PyTorch to train a model on a given dataset.
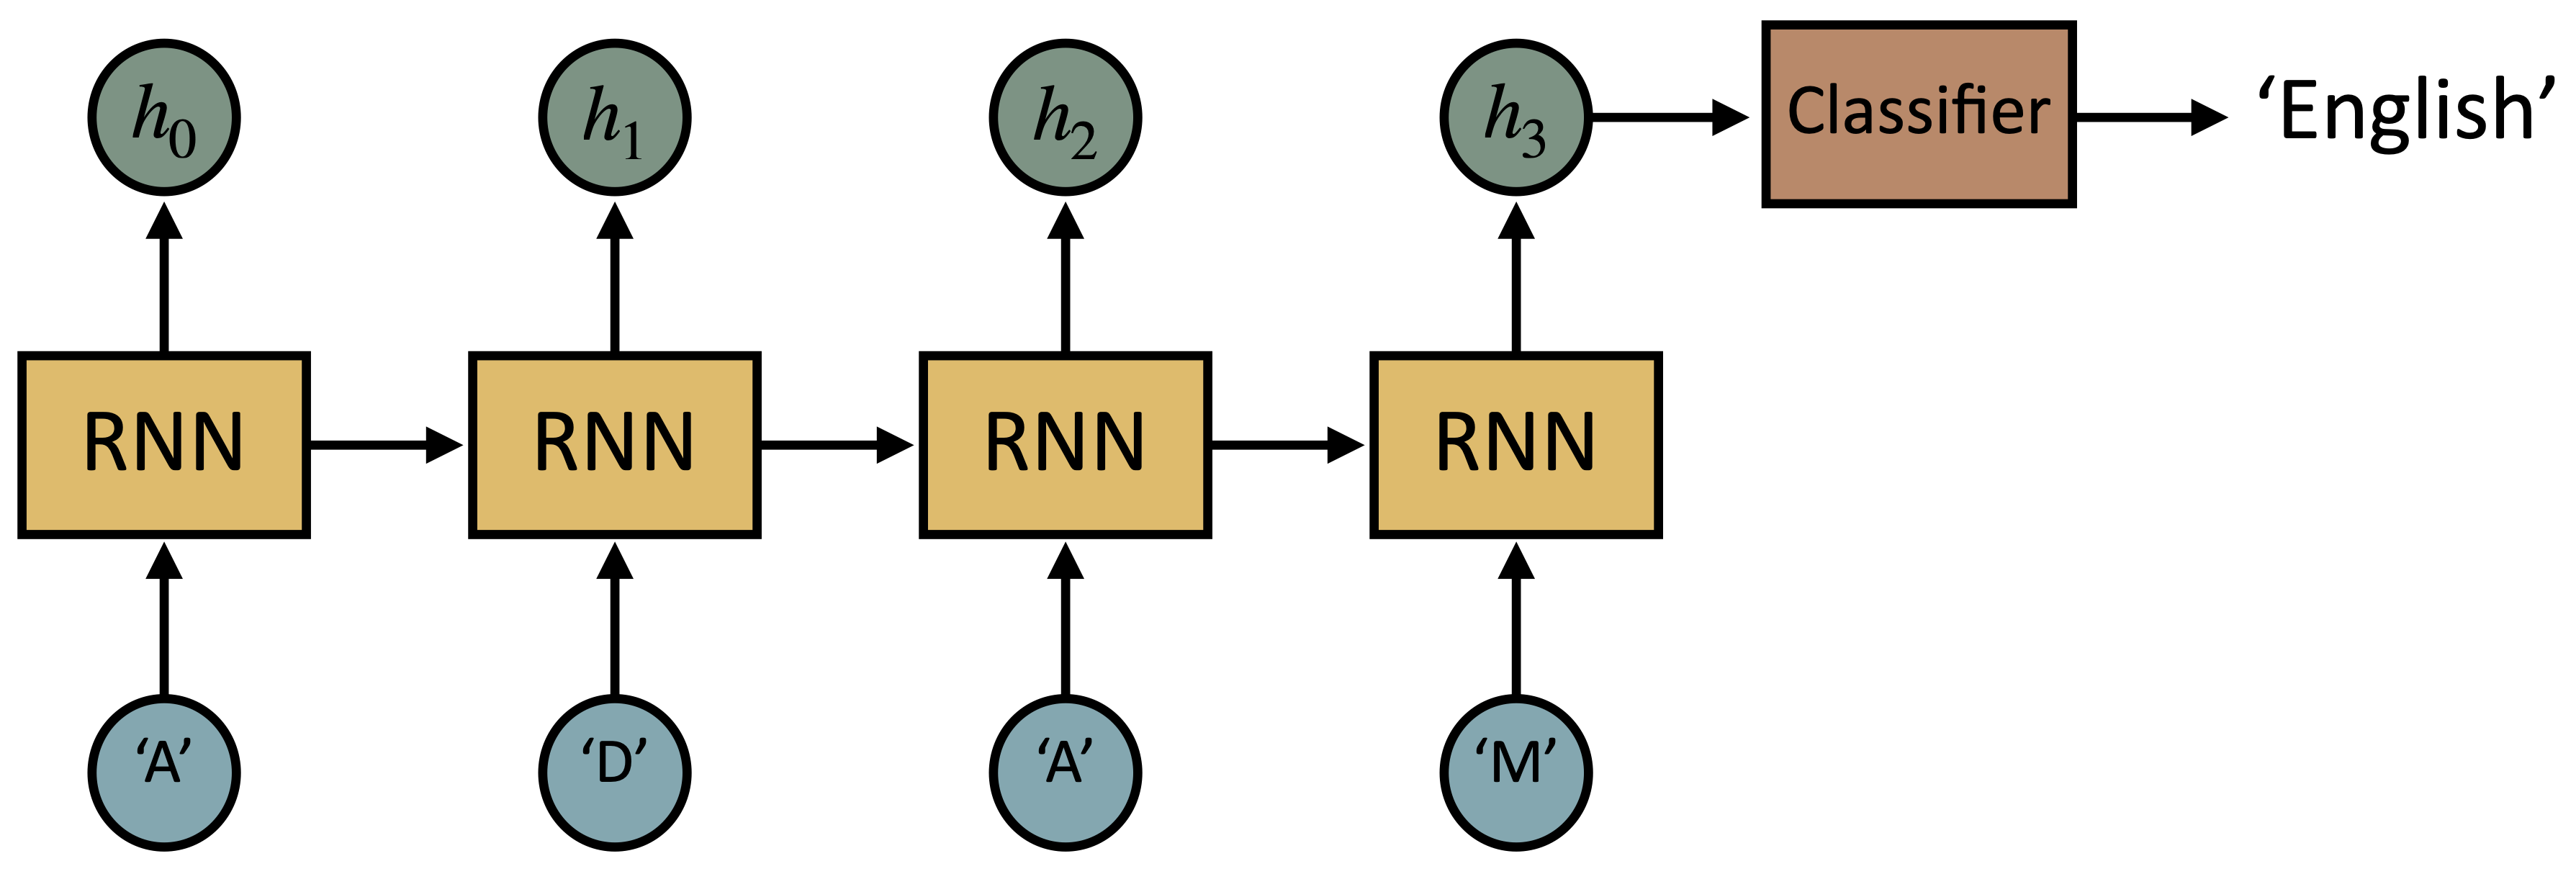
This practical session is about training a model to predict the country of origin of an input name. More specifically, you will be working here with sequences of letters (each letter will be a token): you will have to implement a RNN that takes one letter of the name at a time as input and finally predicts the origin of the entire name.
Installation
We will be coding with Python3 and will use the Pytorch library.
To install Pytorch on your local machine, follow this link
Recurrent Neural Networks
Recurrent Neural networks (RNNs) are powerful neural models that extract information from sequential data. You can refer to your lecture for more information about RNNs, as well as many great online resources.
The dataset
The dataset you will use can be downloaded here. It is composed of pairs of names and associated countries of origin. We are interested in the name folder (you can discard the eng-fra.txt file). Inside this folder, you will find 18 files named as origin.txt containing a list of names with the said origin.
Data pre-processing
When dealing with text data, some pre-processing is usually necessary. The following code does eveything you need. After executing it, you will end up with 3 lists: train_samples, val_samples and test_samples that correspond to our 3 data sets. Each element in a list will be a dictionary with 2 keys: name, i.e. a given input name (sequence of characters) and label which is the id (from 0 to 17) associated with the country of origin of the name. This code also computes the length of the longuest name in the data: this can be useful to pad input sequences (names) of different lengths so that we can build training batches out of them. Some of the defined functions are not directly used in this code snippet (letterToIndex, letterToTensor, lineToTensor) but will be useful later to implement your Dataset class (see next section). These functions build a tensor by encoding each character in the name as a one-hot vector (vector of zeros and only a one at the id position associated to the letter) that thus contains as many elements as existing letters.
from io import open
import glob
import numpy as np
import os
import unicodedata
import random
import string
import torch

def findFiles(path):
    return glob.glob(path)


# Turn a Unicode string to plain ASCII, thanks to https://stackoverflow.com/a/518232/2809427
def unicodeToAscii(s, all_letters):
    return "".join(
        c
        for c in unicodedata.normalize("NFD", s)
        if unicodedata.category(c) != "Mn" and c in all_letters
    )


# Read a file and split into lines
def readLines(filename, all_letters):
    lines = open(filename, encoding="utf-8").read().strip().split("\n")
    return [unicodeToAscii(line, all_letters) for line in lines]


# Find letter index from all_letters, e.g. "a" = 0
def letterToIndex(letter):
    return all_letters.find(letter)


# Just for demonstration, turn a letter into a <1 x n_letters> Tensor
def letterToTensor(letter):
    tensor = torch.zeros(1, n_letters)
    tensor[0][letterToIndex(letter)] = 1
    return tensor


# Turn a line into a <line_length x 1 x n_letters>,
# or an array of one-hot letter vectors
def lineToTensor(line):
    tensor = torch.zeros(len(line), 1, n_letters)
    for li, letter in enumerate(line):
        tensor[li][0][letterToIndex(letter)] = 1
    return tensor


# Listing all possible letters/characters
all_letters = string.ascii_letters + " .,;'"
n_letters = len(all_letters)

# Creating a list of samples for each data set (train, val, test)
# One sample will be a dictionary with 2 keys:
# * "name": the input name which is a sequence of characters (e.g. 'Adam')
# * "label": the origin country of the name (this will be an integer from 0 to 17 as there are 18 countries)
# We will also compute the length of the longuest name in the while data (to be able to pad sequences later when
# building training batches).
train_samples = []
val_samples = []
test_samples = []
max_line_len = 0
for label_id, filename in enumerate(findFiles("data/names/*.txt")):
    lines = readLines(filename, all_letters)

    for line in lines:
        max_line_len = max(max_line_len, len(line))

    # Computing the size of train, val, test sets
    all_indices = np.arange(len(lines)).tolist()
    train_length = int(0.75 * len(lines))
    val_length = int(0.10 * len(lines))
    test_length = len(lines) - train_length - val_length

    # Sampling data to fill our 3 sets
    train_indices = random.sample(all_indices, train_length)
    val_test_indices = [index for index in all_indices if index not in train_indices]
    val_indices = random.sample(val_test_indices, val_length)
    test_indices = [index for index in val_test_indices if index not in val_indices]
    assert len(train_indices) == train_length
    assert len(val_indices) == val_length
    assert len(test_indices) == test_length

    lines = np.array(lines)
    train_samples.extend(
        [{"name": line, "label": label_id} for line in lines[train_indices]]
    )
    val_samples.extend(
        [{"name": line, "label": label_id} for line in lines[val_indices]]
    )
    test_samples.extend(
        [{"name": line, "label": label_id} for line in lines[test_indices]]
    )
Building your dataset
An important class in Pytorch is the Dataset class. In the previous CNN practical, you didn’t have to worry about this step. But here, you must create your class inheriting from torch.utils.data.Dataset and write your custom getitem() and len() methods. len() should return the length of your dataset and getitem() should return a dataset element given its index as input. See the code snippet below to have the structure of the class to implement.
import torch

class CustomDataset(torch.utils.data.Dataset):
    def __init__(self):
        # TODO: Initialize here what you will need in the other methods.
        pass

    def __len__(self):
        return 0 # TODO: modify this method to return the length
                 # of your dataset (i.e. number of elements inside).

    def __getitem__(self, index):
        return {} # TODO: return a dict with keys and values that
                  # contain information from the element at specified
                  # index in the dataset.
A solution
import torch

class CustomDataset(torch.utils.data.Dataset):
    def __init__(self, samples, max_line_len):
        self.samples = samples
        self.max_line_len = max_line_len

    def __len__(self):
        return len(self.samples)

    def __getitem__(self, index):
        sample_dict = self.samples[index]

        name = lineToTensor(sample_dict["name"])
        mask = torch.zeros((self.max_line_len))
        mask[: name.shape[0]] = 1
        name = torch.cat(
            [
                name,
                torch.zeros(
                    (self.max_line_len - name.shape[0], name.shape[1], name.shape[2])
                ),
            ],
            dim=0,
        )

        label = sample_dict["label"]
        label = torch.Tensor([label])
        return {"name": name, "label": label, "mask": mask}
Data loading and visualisation
It is important to visualise the data you will be working on. Moreover, when training and evaluating your model, you will need to load data from your training, validation and test sets respectively. To do so, we will use the DataLoader class from torch.utils.data.
Start by implementing 3 dataloaders for your training, validation and test sets.
A solution
train_dataset = CustomDataset(train_samples, max_line_len)
val_dataset = CustomDataset(val_samples, max_line_len)
test_dataset = CustomDataset(test_samples, max_line_len)

batch_size = 16
train_dataloader = torch.utils.data.DataLoader(
    train_dataset,
    batch_size=batch_size,
    shuffle=True,
)
val_dataloader = torch.utils.data.DataLoader(
    val_dataset,
    batch_size=batch_size,
    shuffle=False,
)
test_dataloader = torch.utils.data.DataLoader(
    test_dataset,
    batch_size=batch_size,
    shuffle=False,
)
Designing a Recurrent Neural Network
It is now time to build a RNN from scratch! Write a class inheriting from torch.nn.Module. Be careful of the dimensions of input tensors and the dimensions of your desired output. For now, you cannot use any other layer than nn.Linear. The goal here is to implement vanilla recurrent layers from scratch that take a tensor as input and maintain a hidden vector memory.
A solution
import torch.nn as nn

class RNN(nn.Module):
    def __init__(self, input_size, hidden_size, output_size):
        super(RNN, self).__init__()
        self.hidden_size = hidden_size
        self.i2h = nn.Linear(input_size + hidden_size, hidden_size)
        self.h2o = nn.Linear(hidden_size, output_size)

    def forward(self, input, hidden):
        combined = torch.cat((input, hidden), 1)
        hidden = self.i2h(combined)
        output = self.h2o(hidden)
        return output, hidden

    def initHidden(self):
        return torch.zeros(1, self.hidden_size)

model = RNN(input_size=57, hidden_size=57, output_size=18)
Loss function and optimizer
The next step is to define a loss function that is suited to the problem. Then you have to choose an optimizer. You are encouraged to try different ones to compare them. You can also study the impact of different hyperparameters of the optimizer (learning rate, momentum, etc.)
A solution
import torch.optim as optim

criterion = torch.nn.CrossEntropyLoss()
optimizer = optim.Adam(model.parameters(), lr=1e-3)
Training loop
It is now to time to write the code for training and validating your model. You must iterate through your training data using your dataloader, and compute forward and backward passes on given data batches. Don’t forget to log your training as well as validation losses (the latter is mainly used to tune hyperparameters).
Be careful: Unlike for CNNs in the previous practical session, the forward pass here will be iterative as you RNN will take as input one character at a time! You need to propagate you hidden state/memory along time.
A solution
from tqdm import tqdm

def forward_pass(name, mask, model):
    out = [None] * name.shape[0]
    hidden = torch.zeros(name.shape[0], 57)
    for i in range(name.shape[1]):
        character = name[:, i].squeeze(1)
        out_, hidden = model(character, hidden)

        for batch_id in range(name.shape[0]):
            if mask[batch_id, i] == 1:
                out[batch_id] = out_[batch_id].unsqueeze(0)
    out = torch.cat(out, dim=0)
    return out


def train_val(run_type, criterion, dataloader, model, optimizer):
    tot_loss = 0.0
    tot_acc = []
    for mb_idx, batch in tqdm(enumerate(dataloader)):
        name = batch["name"]
        label = batch["label"].squeeze(1).long()
        mask = batch["mask"]

        if run_type == "train":
            # zero the parameter gradients
            optimizer.zero_grad()

        # Forward pass
        if run_type == "train":
            out = forward_pass(name, mask, model)
        elif run_type == "val":
            with torch.no_grad():
                out = forward_pass(name, mask, model)

        # Compute loss
        loss = criterion(out, label)

        if run_type == "train":
            # Compute gradients
            loss.backward()

            # Backward pass - model update
            optimizer.step()

        # Logging
        tot_loss += loss.item()
        acc = (out.argmax(dim=1) == label).tolist()
        tot_acc.extend(acc)
    return tot_loss, tot_acc, criterion, dataloader, model, optimizer


epochs = 10
for epoch in range(epochs):
    # Training
    epoch_loss, epoch_acc, criterion, train_dataloader, model, optimizer = train_val(
        "train", criterion, train_dataloader, model, optimizer
    )
    print(
        f"Epoch {epoch}: {epoch_loss/len(train_dataloader)}, {np.array(epoch_acc).mean()}"
    )

    # Validation
    val_loss, val_acc, criterion, val_dataloader, model, optimizer = train_val(
        "val", criterion, val_dataloader, model, optimizer
    )
    print(f"Val: {val_loss/len(val_dataloader)}, {np.array(val_acc).mean()}")
Visualizing your training with Tensorboard
A useful tool to visualize your training is Tensorboard. You can also have a look at solutions such as Weights & Biases, but we will focus on the simpler Tensorboard for now. You can easily use Tensorboard with Pytorch by looking at torch.utils.tensorboard
Saving and loading a Pytorch model
Once training is completed, it can be useful to save the weights of your neural network to use it later. The following tutorial explains how you can do this. Now, try to save and then load your trained model.
Testing your model
You must now evaluate the performance of your trained model on the test set. To this end, you have to iterate through test samples, and perform forward passes on given data batches. You might want to compute the test loss, but also any accuracy-related metrics you are interested in. You could also visualize some test samples along with the output distribution of your model.
Comparing with other recurrent layers
In this final part, replace your custom implementation of a RNN layer with already available layers in Pytorch such as nn.RNN, nn.LSTM or nn.GRU. Which ones works best, and does the simple nn.RNN work better than your custom recurrent layer?